
MOSS-Image layout JSON.
A poster, box by box.
Our test was a pottery-event poster: split the heading across two lines, keep the vase in place, and give the event time more room. MOSS-Image’s layout JSON lets us describe those regions separately. Here is the 768 × 1024 draft we edited and what came out of the export.
Tested 17 October 2026 — desktop Chrome on macOS. We checked layout editing, export, and reopening a saved draft. This walkthrough stops before model inference; the screenshot is the editor’s layout preview.
The workflow: match the canvas to your generation size, give text its own element, enter the exact words, then copy the compiled model prompt. Save the editable draft too: that file keeps the dimensions and lets you revise the composition later.
The poster brief
We used a fictional pottery open-studio event: a large “OPEN STUDIO” heading, a blue ceramic vase in the middle, and “SATURDAY · 10 AM” underneath. Three elements were enough. The vase box reserves space for a subject; the editor does not draw a vase.
The useful part of this brief was having three different decisions to make. The heading needed its own line break; the vase needed a large central region; the short event time needed a wider box near the bottom. We kept those as separate elements on a canvas 768 pixels wide and 1024 pixels tall.
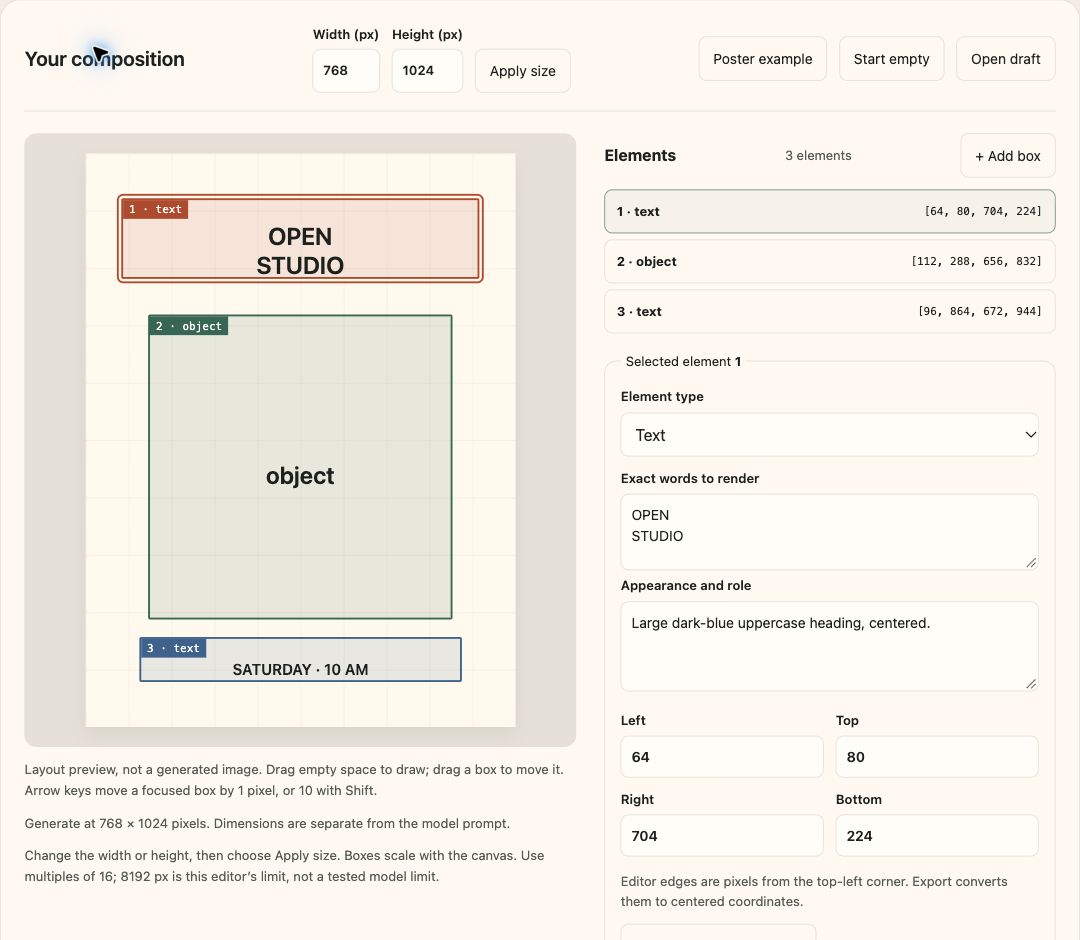
One line break, then a wider footer
We started with Poster example. Its heading read OPEN STUDIO on one line. In element 1’s Exact words to render field, we put a line break after OPEN. Then we moved the top edge from 64 to 80 pixels, leaving left 64, right 704, and bottom 224. The preview showed two lines inside that heading region; the vase region stayed where it was.
For the event time, we used the numeric edge fields. Element 3 started at left 128 and right 640. Changing those edges to 96 and 672 widened the region from 512 to 576 pixels. We also raised its top and bottom edges by 16 pixels, to 864 and 944. The words SATURDAY · 10 AM and their appearance description stayed the same.
That was the useful editing pattern in this run: change the literal words or one box without rewriting the overall scene caption. The preview made the regions easy to inspect, but it could not tell us how the model would fit actual lettering into them.
Saving something we could return to
We kept both downloads. Download prompt saved a 732-byte UTF-8 text file for the generation workflow. Save editable draft saved a 1,045-byte JSON file for continuing the edit. We reopened that draft through the macOS file picker and checked the two-line heading, all three boxes, and the copied prompt. They matched the saved version exactly.
To repeat the edit:
- Load Poster example at 768 × 1024. If you change either dimension, choose Apply size before continuing.
- Edit element 1. Enter OPEN, a line break, then STUDIO. Set its edges to left 64, top 80, right 704, bottom 224.
- Edit element 3. Set left 96, top 864, right 672, bottom 944. Leave element 2 unchanged.
- Save the draft and export the prompt. Reopen the draft when you want to change the composition; use the compiled prompt in a compatible generation workflow.
The two downloads serve different jobs. The checked model prompt is the generation input. The editable draft includes the canvas dimensions and top-left pixel coordinates for reopening in the editor. Keep the width and height with the prompt when moving to a generation workflow.
Why the coordinates change on export
The editor lets you work from the top-left corner. The model prompt uses the canvas center as its origin, with the vertical edges first. Here is the output from this run:
| Element | Editor: left, top, right, bottom | Export: top, left, bottom, right |
|---|---|---|
| Heading | 64, 80, 704, 224 | −432, −320, −288, 320 |
| Vase region | 112, 288, 656, 832 | −224, −272, 320, 272 |
| Event time | 96, 864, 672, 944 | 352, −288, 432, 288 |
We compared the browser export with the official compiler at the checked source revision. Parsing both outputs produced the same object, including the literal text and coordinates. That checks the prompt format; it does not measure image quality.
Two mistakes worth catching before generation
A size change can be easy to miss. We also doubled the example’s width to 1536 while keeping the height at 1024. Apply size scaled the boxes horizontally. That gives you a wider composition, so inspect the preview again and set that same size in the generation app.
An invalid edge should stop export. We tried a left edge beyond the canvas, cleared required text, and entered a width of 1000, which is not divisible by 16. Each case disabled export and displayed a correction. Restore valid values before copying; do not reuse an earlier prompt after changing the draft.
When this approach helps
For this test, separate text fields and saved boxes made revisions easy to follow. The extra work was choosing dimensions and inspecting each region. We would use this workflow for a heading, subject, and small print that need distinct places. For an ordinary scene without placement requirements, a written caption may be simpler. MOSS also provides an official prompt enhancer for people who prefer an agent and a local script.
Its layout format is experimental. We have not tested whether the model obeys this poster or renders its words correctly. Run generation in your own compatible workflow, inspect the image, and revise from that result. The boxes are a plan, not a guarantee of exact placement.
Working with FLUX instead? Its element table uses a different coordinate system; the FLUX 3 bounding box generator prepares that format. Pasting one model’s layout into the other is not a conversion.